
 |
Construction of Optical Tweezers(From Volume II, Section 7 of Cells: A Laboratory Manual )Steven M. Block,
Department of Molecular Biology Princeton University This selected chapter represents a contribution to Cells: A Laboratory Manual (David Spector, Robert Goldman, Leslie Leinwand, eds.). Prepared by Dr. Steven M. Block of Princeton University, the chapter describes the construction of optical tweezers, a single beam optical trap that uses highly focused laser light to trap and manipulate microscopic biological objects, including cells, organelles and chromosomes. Chapter outline
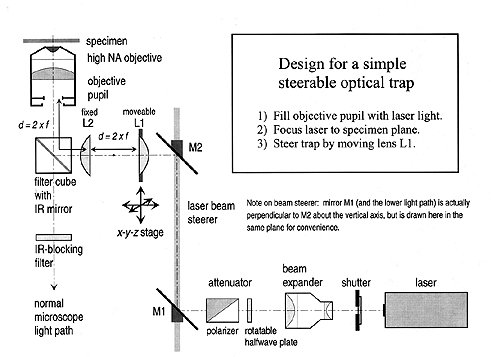
CONSTRUCTION OF OPTICAL TWEEZERSINTRODUCTION TO OPTICAL TRAPPING A single-beam optical trap, or optical tweezers, uses highly focused laser light to grab and manipulate microscopic objects (for reviews on the principles and applications of optical trapping, see Selected References at the end of the chapter). Optical tweezers derives its unique trapping capability from the three-dimensional gradient in light intensity found near a focus. When a moderately powerful laser is focused to a diffraction-limited spot in the specimen plane of a microscope, a steep gradient in light is produced in the focal region. Small dielectric objects, such as latex or silica micro-spheres, or biological material, including cells, chromosomes, and organelles, experience a form of radiation pressure, called the �gradient force�, that tends to draw them towards the center of that region. Another form of radiation pressure, usually called the scattering force, arises from reflection or absorption of light, and it tends to push objects down along the beam, in the direction of propagation of the light, much as a stream of water from a fire hose propels objects away from the nozzle. Stable, three-dimensional trapping takes place when the effect of gradient force is sufficiently large to overcome the fire hose effect of the scattering force. In practice, such a condition can be achieved by using microscope objectives with the highest possible numerical aperture, which generate the steepest gradients. The numerical aperture (NA) equals the index of refraction of the immersion fluid (air, water, or oil) multiplied by the sine of the half-angle of opening of the focused light: typical values for high NA objectives are in the range of 1.00–1.40, corresponding to full angles of opening up to 140°. In practice, trapping lasers focus from 10 mW to 1 W of light into the microscope, producing huge fluxes at the specimen plane, ranging from 106–108 W/cm2. To diminish the possibility of optical damage (“opticution”) arising from these enormous power levels, a laser whose wavelength lies in the near infrared region is generally used. This is because visible light is heavily absorbed in naturally-occurring pigments found in biological material, while far infrared light is absorbed by water. Most biological specimens—but not all—are fairly transparent in between, over the near infrared region from 700–1300 nm. Near infrared sources with sufficient power to trap include the Nd:YAG [neodymium: yttrium-aluminum-garnet] and Nd:YLF [neodymium: yttrium-lithium-fluoride] lasers, at 1064 and 1047 nm, respectively, the Ti:Al2O3 [titanium: sapphire] laser, continuously tunable from 695–1100 nm, and various diode lasers, available at wavelengths from 700–1300 nm, with highest powers from 800–900 nm. All are suitable for trapping, but vary widely in cost, ease of use, etc. To produce the steepest light gradient, trapping lasers are run in the lowest-order mode, called TEM00, or, for diode lasers, single mode. Laser prices vary widely, depending on the power and laser type. At lower power levels, diode lasers are the most convenient choice, and, as with most developments of the semiconductor industry, the average cost per unit is dropping and the average power per unit is increasing. However, high power single mode diode lasers must be corrected for their non-circular beams and astigmatism using additional optics (cylindrical lenses or anamorphic prisms), and often require thermoelectric cooling. Some laser diode manufacturers will provide these items in a ready-to-go package, or you can do it yourself. An optical trap based on a 200 mW diode laser (850 nm) is available commercially (LaserTweezers® 2000, Cell Robotics, Albuquerque NM). Nevertheless, for reasons of economics, practicality, modifiability, or individuality, you may wish to roll your own. This chapter covers the basic principles involved in building optical tweezers. The device described here, while quite simple overall, produces a fully-functional optical trap that can be steered in the specimen (x-y) plane as well as in the axial (z-) direction using external optics. The design features a shutter for safety, an attenuator for variable power operation, and easy alignment (crucial!). Most of the parts are standard components available from such optical manufacturers as Ealing, Edmund, Melles Griot, Newport, New Focus, Oriel, etc. No special machining is required: this design takes advantage of the epi-illumination port available on most research microscopes equipped for fluorescence. Best of all, it can be built by anyone familiar with a microscope but with little prior experience in optics, and this article should teach you most of what you�ll need to know but by all means, feel free to learn more! Figure 1 illustrates how beam-steering, or scanning, is accomplished in a light microscope. The same principles are involved regardless of whether one is scanning the beam for a confocal laser system or moving an optical trap. When properly set up and aligned, microscopes have two different sets of planes, called here the “image” and “aperture” planes. Planes within each set are said to be optically conjugate to one another: when anything is in focus in one of these planes, it is in focus in all the others. Thus, the retina of the person viewing the microscope (or, for that matter, the camera focal plane), the intermediate image, the specimen plane, and the field diaphragm form one conjugate set: the image planes. Likewise, the eyepoint of the eyepiece, the objective rear pupil, the condenser aperture, and the lamp filament (the last being included when using K�hler illumination) form a second conjugate set: the aperture planes. These two sets bear a special relationship to one another: translation of an object (or its image) along an axis in an image plane produces rotation of the beam about an axis through an aperture plane, and vice versa. Thus, to steer a focused spot of light in the specimen plane, one rotates it about an axis running through an aperture plane. One particularly convenient plane to use is the eyepoint, where rays of light focused in the image plane are parallel. This scheme is used by several commercial scanning confocal microscopes to scan the laser spot. An analogous approach will be used to scan our optical trap. Figure 2 shows a highly schematized layout for the trap. This design can be adapted to work with most research microscopes equipped for epifluorescence (Nikon, Olympus, Zeiss). Traps based on this design have already been built successfully by the author on the following microscope models: Nikon Diaphot (original model), Nikon Diaphot 200 & 300, Zeiss Axioskop, Zeiss Axiovert, and Zeiss Universal. Microscopes that have a parallel light path behind the objective lens are particularly simple to work with: these include most inverted microscopes (e.g., Nikon inverted scopes, which have a negative lens in the objective turret to produce parallel light), or those equipped with objectives having a rear focal plane is at infinity (e.g., microscopes using Zeiss ICS objectives). With little or no modification, this trap can be combined successfully with most imaging modes, including brightfield, darkfield, phase contrast, and differential interference contrast (“Nomarski” DIC). Phase contrast is not particularly recommended for high power use, however, since the phase rings inside the objective absorb a portion of the laser light and cause heating. Passing a laser beam through the Wollaston prisms used in DIC imaging poses no particular problems, by the way. Since this trap occupies the epi-fluorescence port, use of the fluorescence mode is problematic. With some extra work, however, the design can be altered to accommodate fluorescence illumination as well. One way is to combine the infrared laser and short-wavelength epi-illumination lights together outside the microscope and use a special dichroic mirror in the filter cube (that reflects, say, both blue and infrared but passes green and red in between). Another is to alter the microscope to accommodate two, stacked dichroic filter holders, one above the other, so that the laser can be introduced into one and the epi-illuminator light into the other. In the latter case, the conventional dichroic mirrors can be used. The heart of the design is a simple 1:1 telescope arrangement that is used to both steer and parfocalize the laser spot. Two identical planoconvex lenses, L1 and L2, are placed the sum of their focal lengths apart, so that parallel light in produces parallel light out of the same beam size. (For alternative designs, see the review by Svoboda & Block, 1994 in the References). By placing these lenses with their flat surfaces facing one another, spherical aberration is minimized without resorting to expensive aplanatic lenses. The rearmost lens is mounted on an x-y-z translation stage or micromanipulator. To a good approximation, movements of this lens in all three dimensions generate corresponding movements of the laser trap in the same three dimensions. Here�s how it works. Movement in the axial direction occurs because, as L1 is pushed towards L2 (defined here as the axial, or z-direction), the parallel beam entering the telescope (at the back of L1) becomes somewhat divergent after leaving L2. This pushes the focal spot away from the objective and deeper into the specimen. Likewise, as L1 is pulled away from L2 in the axial direction, the light from the telescope becomes somewhat convergent, bringing the focus towards the objective. Movement of lens L1 in the x-y plane, perpendicular to the optical axis, produces a deflection in the light leaving the lens—rotating the beam, in essence. If lens L2 is imaged into the back of the objective pupil, then this rotation occurs in a conjugate plane to the objective pupil, resulting in a translation of the laser spot, as described above. Lens L1 accomplishes this imaging by virtue of its location at a distance 2f behind the objective pupil, where f is the focal length of L1 (or L2). N.B: in practice, this distance need not be strictly equal to 2f, and one can get away with somewhat larger distance, although in that case a portion of the laser light will be blocked by the back aperture of the objective when the beam is steered away-from-center, diminishing trapping strength. In some designs, it may be desirable to produce additional beam expansion in the telescope formed by L1 and L2, instead of doing it all in the laser beam expander placed earlier in the optical train. In this case, the focal length of L1 should be chosen to be less than L2 (say, f /2 for a 2� expansion) and the position of L2 should be adjusted accordingly. List of Parts
Putting it all together Place the microscope on a solid, level, flat surface. An optical table is best but certainly not required. Insert the high NA objective in one position of the turret, as well as a low power brightfield objective (say, 10×) in another, to be used for rough beam alignment. Mount the laser at tabletop level as far away as convenient from the microscope (give yourself room to work!) and point it perpendicular to front-to-back axis of the microscope. Make absolutely sure there is adequate room behind and to the side of the microscope. Insert the IR-reflecting mirror inside the filter cube and place it in the microscope. Insert an IR blocking filter under the eyepieces (say, inside the binocular unit) for safety. If the epi-illumination optics comes equipped with a built-in lens that can serve the role of L2 (e.g., the lens at the end of the epi-illuminator arm on the Zeiss Axioskop or the original model of the Nikon Diaphot), you may consider using this same lens in its usual position instead of providing your own. Otherwise, remove the epi-illuminator arm (or at least parts of it), so that a free optical path leads from the back of the objective to the filter cube and on out of the microscope. Make sure there are no heat filters in the way: these block infrared light (the old Nikon Diaphot had one in the turret housing)! Similarly, make certain that there are no polarizing filters in this path (some microscope carry polarizers for DIC imaging between the filter cube and the objective, but most are placed safely behind the cube). Crudely position lens L2 a distance 2f behind the objective pupil, or as close as possible to that position if it cannot be placed there (this is often right against the rear of the microscope, or possibly just inside it) at the correct height for the optical axis of the filter cube. Mount and crudely position lens L1 and its x-y-z stage. Mount the laser beam steerer and rough-align it: mirror M2 goes at the same height as the optical axis of the filter cube, and mirror M1 goes at the same height as the optical axis of the laser on the tabletop. Follow the diagram in Figure 2. Position the attenuator, beam expander, and shutter on a single line between mirror M1 and the laser. These three may be mounted together on an optical rail, if desired. The exact order of the beam expander, attenuator, and shutter is to some extent arbitrary. However, for use at high power, and especially with neutral density attenuators, it may be desirable to spread the laser light over a larger aperture by placing the beam expander first, so as to prevent optical damage. (The shutter, too, may require positioning after the beam expander.) However, if a polarizing prism/waveplate combination is used in this position, a larger —hence more expensive— prism might be required. (Similarly, larger shutter apertures are more costly and open/close more slowly.) Power levels permitting, it may be advantageous to place both attenuator and shutter in front of the beam expander, as shown in Figure 2. Alignment Procedure Let's begin alignment. As you probably know, there are many ways to skin a cat when it comes to aligning any optical system. The method described here is tried-and-true, though, and contains several useful tricks. IR lasers can be more difficult to work with because their beams are invisible. Still, with a bit of care, exact alignment can be accomplished fairly painlessly. In fact, several of the steps (chiefly those that verify what's been done) can be skipped altogether once you get the hang of the whole process, and alignment can be accomplished more rapidly. Plus, once the basic alignment is done, most of the parts won't need to be tweaked further. Turn on the microscope, and place a not-too clean glass microscope slide (with no specimen or cover glass, but perhaps a bit of dust or a fingerprint or two on it) on the stage. Focus the 10× low power objective on the slide's surface and align and center the condenser as well, then turn off (or block) the microscope illuminator. Put on your laser goggles! Always align the laser at the lowest possible power, so adjust the attenuator accordingly. Now turn on the laser. We begin by aligning the first portion of the path, which is the easy part. Beginning at the laser output window and using the IR phosphor card to see the beam, align the shutter, beam expander, and attenuator so that the beam passes “dead on” through the center of these devices (the beam expander is particularly important: make sure the laser is on center both coming in and going out). Then adjust mirror M1 of the laser beam steerer to send the beam vertically. Now we'll coarse-align the upper path. Temporarily i>remove lenses L1 and L2, and turn the microscope turret to a position where there is no objective screwed in. Verify that the filter cube is in position. Lay the IR card on the microscope stage in the specimen position, in place of the glass slide, and lower (or raise, if using an inverted microscope) the condenser temporarily out of the way, but don't touch the microscope's focusing knob. Now, adjust mirror M2 of the beam steerer (and possibly M1 as well) until the light passes into the microscope and reflects straight up through the specimen plane vertically. You should also try placing the card lower, right over the empty objective turret, and verify that the beam passes through the center of the turret hole. Then insert lens L2 (only) and position it in such a way that the light continues to pass vertically up through the specimen and through the center of the turret hole. The laser light should come to a focus somewhere behind the turret hole at this stage. Swing back the 10× objective. Once again, place the IR card in the specimen position and adjust M1 and M2 as necessary to center the light. Insert lens L1 and using the IR card, crudely adjust its x-y position by eye in such a way that the light beam hits the lens at its exact center. Fix the z-position of L1 using a ruler, placing it 2f behind L2, where f is the focal length of L1 and L2. Swing the objective turret once more to an open position and place the IR card back in the specimen position. This time, leaving M1 and M2 as they were, adjust the x-y position of L1 until a uniform vertical beam emerges once again (checking again the centering at the turret opening as well as the specimen). We are now ready for fine-alignment of the upper path. Swing in the 10× objective and return the condenser to its original position. Place the IR card somewhere convenient behind the condenser. If everything was done right, the card should be illuminated with a nice, uniform disk of light once more. If not, then adjust the x-y position of L1 until it is (you may have to iterate on the steps above, but probably not if you've been careful up to this point). You are now ready to “hunt” for the beam on the TV camera. Shutter the laser and turn on the microscope light, then verify that it is still in alignment (both the objective and condenser) and focused on the slide. Get an image on the TV monitor. Then turn off the microscope light and un-shutter the laser. Don't look into the microscope while the laser is on: use the TV image. (If you previously placed an IR-blocking filter in the normal microscope path, as shown in Figure 2, remove it for now: this can be re-inserted when the trap is all aligned). You should see a bright spot on the screen, corresponding to where the laser light bounces off the slide (if not, go back and re-do the above). You will often see various stripes, spots, and other patterns at this stage, due to small amounts of scattered light in the preparation, Newton's fringes in the glass, and other interference phenomena. This is normal. The main laser spot, however, is the brightest of all, and it disappears when you're out of focus—the other patterns don't, by and large. Center the laser spot in the field of view using the x-y controls for L1. Now, using the z-control, minimize the diameter of the spot: this should bring the laser roughly into focus at the specimen plane. You may not find the laser spot if the microscope has drifted a bit out of focus, so be prepared to touch up the focus a bit during this procedure. At this stage, we're ready for crude trapping and final alignment. Shutter the laser again. Prepare a microscope specimen that can be easily trapped: a suspension of either yeast or bacterial cells at moderate density works best, or you can also substitute a suspension of silica microspheres (0.2 to 1.2 mm diameter, whatever's handy) or even blood cells. Latex microspheres can be used, but these are not recommended, since they don't trap as easily in the axial direction. Use a sealed grease ring or tunnel slide or flow chamber or any other mount that allows the preparation to have some depth, say 50–100 µm or more, between the coverglass and the slide. Put the specimen on the stage, then place a drop or two of immersion fluid on it (oil or water, depending on your objective) and swing in the high power objective. (If you are using an oil-immersion condenser, place immersion oil on this as well). Turn on the microscope, then focus and align it in the usual way on the specimen. Adjust the position of focus to the top of the chamber (to the bottom if an inverted microscope), on the interior chamber surface nearest the objective lens (at the glass-water interface). Turn off the microscope once more and un-shutter the laser. Using the video camera, locate the laser spot, and center it once more using the x-y controls of L1. If this is not possible, it is probably because (1) the microscope is not focused properly at the glass-water interface, or (2) the earlier alignment procedure wasn't performed correctly. Assuming that you can view the laser spot on camera, you are now ready for the final alignment step, namely, “walking the beam” until it is precisely coaxial with the optical axis of the objective. This is done in a series of small, iterated beam rotations (by means of lens L1) and translations (by means of mirror M2) that ultimately a produce perfect, diffraction-limited spot. First, turn the focusing knob gently up and down through the plane of the glass-water interface. You will see the laser spot shrink to a small circle at the interface, but expand to either side of it. In general, this expansion will be asymmetric: for example, the light will appear to come in from the right and leave to the left, or in from the bottom and out towards the top, etc. The purpose of this final adjustment is to cause the light to form a uniformly circular set of rings that will collapse to a single point at focus and expand back into a uniform circular set of rings beyond it. This is accomplished by (1) moving the spot away from the center of the field a bit, using L1 (or M2), but then (2) restoring it to the center using either M2 (or L1). You'll have to determine which to start with, the mirror or the lens: one choice will make things worse, the other will make things better. The main point is to use the opposite control for restoring the spot to the center to the one just used for moving it away, and to keep doing this until the light is well-symmetrized, as confirmed by focusing up and down through the interface. This set of adjustments must be done twice: once for the x-direction and once for the y-direction. Be sure to use the corresponding pairs of knobs on L1 and M2 that produce just the desired x- (or y-) movement. When the beam looks circular and coaxial, you're done and ready to trap! Turn the microscope illuminator back on and bring the laser up to a higher power using the attenuator: you should begin to see some of the objects in your specimen already caught by the trap (unless their density is too low, in which case you should move the microscope stage until something comes into view that can be captured). Try moving lens L1 and the trapped object(s) ought to move correspondingly. In fact, you should now be able to manipulate the object anywhere in the field of view using the controls on L1. Focus a bit below (above, if an inverted microscope) the coverslip and try to trap a single object. Is it still in sharp focus? If not, adjust the z-control of L1 slightly until the trapping zone is perfectly parfocal with the specimen plane. This control may require some tweaking for different kinds of objects, say, silica beads vs. mitochondria, since these will trap at different heights with respect to the laser focus. Congratulations: your trap is fully aligned and operational! As a last touch, you may wish to balance the relative levels of IR and visible light reaching the video camera, so that the laser trapping spot can be easily spotted against the background image, but does not overwhelm the camera. One convenient way to do this is to select an appropriate IR filter that blocks some, but not all, of the laser light (see Figure 2), and place this in the optical path of the microscope somewhere between the back of the filter cube and the camera (inside the C-mount adapter is one place, a substage slider in an inverted microscope is another). Some trial and error may required to select the proper balance. Finally, recall that high power IR lasers are invisible and potentially dangerous, especially if they are allowed to impinge at full power upon your retina. Take safety precautions, including placing IR blocking filters in parts of the optical path where IR is not needed, e.g., before the eyepieces. Wear safety goggles while aligning the trap. Post signs. Consider enclosing the external beam path so that nothing can accidentally be placed into it. Above all, use caution coupled with common sense. There are many ways to “soup up” this design. If you want to get fancier, you might consider one or more of these improvements. 1) Use a motorized manipulator for lens L1 and control it using knobs, a joystick, or a computer. While you're at it, you could build a fancy computer-driven video overlay device that tracks and displays the position of the trap, superposing it on the image on the video screen at all times, and indicates if the trap is on or off. 2) Use a piezoelectric stage positioner driven by a computer-controlled voltage. This is especially helpful in calibrating the forces produced by the optical trap against Stoke's drag on particles, as well as with micromanipulation tasks. 3) Consider motorizing the focus of the microscope, or, as an alternative, moving the objective in the axial direction with a piezoelectric device. You may also wish to automate the attenuator and/or shutter. 4) Combine an optical trap with fluorescence imaging, using the approaches discussed earlier, namely, superpose the trapping and epi-illuminating lights, or use two stacked dichroic filter cubes. 5) Consider using the telescope L1/L2 only to parfocalize the trap and the specimen, and use another potentially faster method to steer the trap, for example: galvanometer mirrors, or acousto-optic or electro-optic beam deflectors (see review by Svoboda & Block, 1994). 6) Build a position-sensitive detector that can determine the displacement of a particle with respect to the center of the optical trap to nanometer (or better) recision. This detector can be based on a quadrant photodiode or a dual-beam interferometer. The detector can then be used to calibrate force accurately and thereby turn the optical manipulator into a practical “picotensiometer”. With a position-sensitive detector, it is further possible to produce a closed-loop feedback device that can function as an isometric “tension clamp” (see both Finer, et al., 1994 and Svoboda & Block, 1994). LEGAL DISCLAIMER Lasers can cause damage to material and injury to people. These instructions are provided for educational purposes only. While effort has been made to insure safety and reliability, the author assumes no liability whatsoever for damages consequent to any activity related to these protocols. ACKNOWLEDGMENTS The author thanks Howard Berg, Christoph Schmidt, Karel Svoboda, and Koen Visscher for helpful discussions and comments. Block, S.M. Optical tweezers: a new tool for biophysics. In J.K. Foskett & S. Grinstein, eds. "Noninvasive Techniques in Cell Biology," New York: Wiley-Liss. Mod. Rev. Cell Biol. 9: 375-402 (1990). Slightly out-of-date, but a good all-around introduction at the “Scientific American” level. Block, S.M. Making light work with optical tweezers. Nature 360:493-495 (1992). A short, accessible review of basic principles and recent applications. Finer, J.T., Simmons, R.M. and Spudich, J.A. Single myosin molecule mechanics: piconewton forces and nanometre steps. Nature 368: 113-119 (1994). A tour de force of optical tensiometry. Kuo, S.C. and M.P. Sheetz. Optical tweezers in cell biology. Trends Cell Biol. 2: 116-118. (1992). Another short, accessible review of basic principles and recent applications. Simmons, R.M. and J.T. Finer. Glasperlenspiel II: Optical Tweezers. Curr. Biol. 3: 309-311 (1993). A nice write-up on how to do optical tensiometry using force feedback. Svoboda, K. and Block, S.M. Biological applications of optical forces. Ann. Rev. Biophys. Biomol. Struct. 23: 247-285 (1994). This is the basic manual. If you want to get serious about optical trapping, read this. Svoboda, K. and Block, S.M. Force and velocity measured for single kinesin molecules. Cell 77: 773-784 (1994). This and the following paper demonstrate the power of optical trapping combined with interferometry. Svoboda, K., Schmidt, C.F., Schnapp, B.J., and S.M. Block. Direct observation of kinesin stepping by optical trapping interferometry. Nature 365:721-727 (1993). Companion to the previous paper. |
| © Cold Spring Harbor Laboratory Press | Contact: [email protected] |
Watson School of Biological Sciences • CSHL Press